You could actually skip this whole section for those who are already familiar with the topic, but we highly recommend you read it because this is the heart of Linux. We also advise you to go through this section while sitting in front of the computer.
Most readers will be familiar with DOS in Windows and opening a DOS box. Well, let's put it this way.. comparing the power of the Linux command line with the power of the DOS prompt is like comparing a Ferrari with a bicycle!
People may tell you that the Linux command line is difficult and full of commands to remember, but it's the same thing in DOS and just remember - you can get by in Linux without ever opening a command line (just like you can do all your work in Windows without ever opening a DOS box !). However, the Linux command line is actually very easy, logical and once you have even the slightest ability and fluency with it, you'll be amazed as to how much faster you can do complicated tasks than you would be able to with the fancy point-and-click graphics and mouse interface.
To give you an example, imagine the number of steps it would take you in Windows to find a file that has the word "hello" at the end of a line, open that file, remove the first ten lines, sort all the other lines alphabetically and then print it. In Linux, you could achieve this with a single command! - Have we got your attention yet ?!
Though you might wonder what you could achieve by doing this - the point is that you can do incredibly complicated things by putting together small commands, exactly like using small building blocks to make a big structure.
We'll show you a few basic commands to move around the command line as well as their equivalents in Windows. We will first show you the commands in their basic form and then show you how you can see all the options to make them work in different ways.
The Basic Commands
As a rule, note that anything typed in green 'single quotes and italics' is a valid Linux command to be typed at the command line, followed by Enter.
We will use this rule throughout all our tutorials to avoid confusion and mistakes. Do not type the quotes and remember that, unlike Windows, Linux is case sensitive, thus typing ‘Document' is different from typing 'document'.
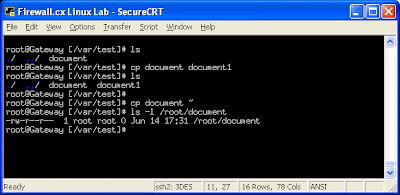
• ls - You must have used the 'dir' command on Windows... well this is like 'dir' command on steroids! If you type 'ls' and press enter you will see the files in that directory, there are many useful options to change the output. For example, 'ls -l' will display the files along with details such as permissions (who can access a file), the owner of the file(s), date & time of creation, etc. The 'ls' command is probably the one command you will use more than any other on Linux. In fact, on most Linux systems you can just type 'dir' and get away with it, but you will miss out on the powerful options of the 'ls' command.
• cd - This is the same as the DOS command: it changes the directory you are working in. Suppose you are in the '/var/cache' directory and want to go to its subfolder 'samba' , you can type 'cd samba' just as you would if it were a DOS system.
Imagine you were at the '/var/cache' directory and you wanted to change to the '/etc/init.d' directory in one step, you could just type 'cd /etc/init.d' as shown above. On the other hand, if you just type 'cd' and press enter, it will automatically take you back to your personal home directory (this is very useful as all your files are usually stored there).
We also should point out that while Windows and DOS use the well known back-slash ' \ ' in the full path address, Linux differentiates by using the forward-slash ' / '. This explains why we use the command 'cd /etc/init.d' and not 'cd \etc\init.d' as most Windows users would expect.
• pwd - This will show you the directory you are currently in, should you forget. It's almost like asking the operating system 'Where am I right now ?'. It will show you the 'present working directory'.
• cp - This is the equivalent of the Windows 'copy' command. You use it to copy a file from one place to another. So if you want to copy a file called 'document' to another file called 'document1' , you would need to type 'cp document document1'. In other words, first the source, then the destination.
The 'cp' command will also allow you to provide the path to copy it to. For example, if you wanted to copy 'document' to the home directory of user1, you would then type 'cp document /home/user1/'. If you want to copy something to your home directory, you don't need to type the full path (example /home/yourusername), you can use the shortcut '~' (tilda), so to copy 'document' to your home directory, you can simply type 'copy document ~' .
• rm - This is the same as the 'del' or 'delete' command in Windows. It will delete the files you input. So if you need to delete a file named 'document', you type 'rm document'. The system will ask if you are sure, so you get a second chance! If you typed 'rm –f' then you will force (-f) the system to execute the command without requiring confirmation, this is useful when you have to delete a large number of files.
In all Linux commands you can use the '*' wildcard that you use in Windows, so to delete all files ending with .txt in Windows you would type 'del *.txt' whereas in Linux you would type 'rm -f *.txt'. Remember, we used the '-f' because we don't want to be asked to confirm the deletion of each file.
To delete a folder, you have to give rm the '-r' (recursive) option; as you might have already guessed, you can combine options like this: 'rm -rf mydirectory'. This will delete the directory 'mydirectory' (and any subdirectories within it) and will not ask you twice. Combining options like this works for all Linux commands.
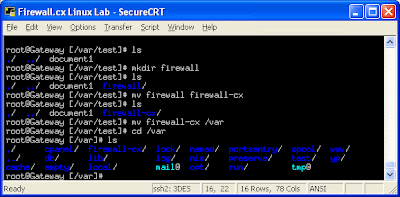
• mkdir / rmdir - These two commands are the equivalent of Windows' 'md' and 'rd', which allow you to create (md) or remove (rd) a directory. So if you type 'mkdir firewall', a directory will be created named 'firewall'. On the other hand, type 'rmdir firewall' and the newly created directory will be deleted. We should also note that the 'rmdir' command will only remove an empty directory, so you might be better off using 'rm -rf' as described above.
• mv - This is the same as the 'move' command on Windows. It works like the 'cp' or copy command, except that after the file is copied, the original source file is deleted. By the way, there is no rename command on Linux because technically moving and renaming a file is the same thing!
In this example, we recreated the 'firewall' directory we deleted previously and then tried renaming it to 'firewall-cx'. Lastly, the new directory was moved to the '/var' directory:
That should be enough to let you move around the command line or the 'shell', as it's known in the Linux community. You'll be pleased to know that there are many ways to open a shell window from the ‘X' graphical desktop, which can be called an xterm, or a terminal window.
• cat / more / less - These commands are used to view files containing text or code. Each command will allow you to perform a special function that is not available with the others so, depending on your work, some might be used more frequently than others.
The 'cat' command will show you the contents of any file you select. This command is usually used in conjunction with other advanced commands such as 'grep' to look for a specific string inside a large file which we'll be looking at later on.
When issued, the 'cat' command will run through the file without pausing until it reaches the end, just like a file scanner that examines the contents of a file while at the same time showing the output on your screen:
In this example, we have a whopper 215kb text file containing the system's messages. We issued the 'cat messages' command and the file's content is immediately listed on our screen, only this went on for a minute until the 'cat' command reached the end of the file and then exited.
Not much use for this example, but keep in mind that we usually pipe the output to other commands in order to give us some usable results :)
'more' is used in a similar way, but will pause the screen when it has filled with text, in which case we need to hit the space bar or enter key to continue scrolling per page or line. The 'up' or 'down' arrow keys are of no use for this command and will not allow you to scroll through the file - it's pretty much a one way scrolling direction (from the beginning to the end) with the choice of scrolling per page (space bar) or line (enter key).
The 'less' command is an enhanced version of 'more', and certainly more useful. With the less command, you are able to scroll up or down a file's content. To scroll down per page, you can make use of the space bar, or CTRL-D. To scroll upwards towards the beginning of the file, use CTRL-U.
It is not possible for us to cover all the commands and their options because there are thousands! However, we will teach you the secret to using Linux -- that is, how to find the right tool (command) for a job, and how to find help on how to use it.
Can I Have Some Help Please?
To find help on a command, you type the command name followed by '--help'. For example, to get help on the 'mkdir' command, you will type 'mkdir --help'. But there is a much more powerful way...
For those who read our previous section, remember we told you that Linux stores all files according to their function? Well Linux stores the manuals (help files) for every program installed, and the best part is that you can look up the 'man pages' (manuals) very easily. All the manuals are in the same format and show you every possible option for a command.
To open the manual of a particular command, type 'man' followed by the command name, so to open the manual for 'mkdir' type 'man mkdir':
Interestingly, try getting help on the 'man' command itself by typing 'man man'. This is the most authoritative and comprehensive source of help for anything you have in Linux, and the best part is that every program will come with its manual! Isn't this so much better than trying to find a help file or readme.txt file :) ?
Here's another incredibly useful command -- if you know the task you want to perform, but don't know the command or program to use, use the 'apropos' command. This command will list all the programs on the system that are related to the task you want to perform. For example, say you want to send email but don't know the email program, you can type 'apropos email' and receive a list of all the commands and programs on the system that will handle email! There is no equivalent of this on Windows.
Where Is That File?
Another basic function of any operating system is knowing how to find or search for a missing or forgotten file, and if you have already asked yourself this question, you'll be pleased to find out the answer :)
The simplest way to find any file in Linux is to type 'locate' followed by the filename. So if you want to find a file called 'document' , you type 'locate document'. The locate command works using a database that is usually built when you are not using your Linux system, indexing all your files and directories to help you locate them.
You can use the more powerful 'find' command, but I would suggest you look at its 'man' page first by typing 'man find'. The 'find' command differs from the 'locate' command in that it does not use a database, but actually looks for the file(s) requested by scanning the whole directory or file system depending on where you execute the command.
Logically, the 'locate' command is much faster when looking for a file that has already been indexed in its database, but will fail to discover any new files that have just been installed since they haven't been indexed! This is where the 'find' command comes to the rescue!


 Don’t you miss the days of Napster and Kazaa when any music soundtrack was just a click away? But thanks to the bullyish ways of RIAA who haven’t recognized the changing trends in music sales, we were penalized heavily for even trying to download single tracks for our personal use (until iTunes knocked some sense into them). Before I get into describing this process to download music online that I stumbled on recently, I wish to make clear that I am in no way endorsing piracy but am only pointing you to resources that are already available out there.Online music has changed from being resident on servers or personal computers waiting to be downloaded or shared to being available in streaming format on various websites. You can listen all you want but you cannot download them to listen offline; just like radio but without the irritating RJ chatter. But there is a way you can download these streaming songs to your PC and all you need is a freely-available software and a conversion tool.
